Saturday, 1 June 2019

update drivers with driver booster

Driver Booster 6 is a powerful and easy-to-use driver updater. With the best 1-click solution and a large database, Driver Booster 6 can help you rapidly & securely update outdated drivers, install missing drivers, and fix incorrect drivers. By solving these driver issues, it keeps your PC away from system crash, BSOD, no audio, bad resolution, network failure, etc. to increase your system compatibility and stability while saves you plenty of time and effort.
Besides, the brand new feature -Boost in Driver Booster 6 offers very easy solutions for ultimate gaming experience and top system performance.

System Requirements

  • Windows XP/Vista/7/8/8.1/10
  • 1 GB of free disk space mainly for driver download and installation
  • 1024*768 screen resolution and above

Install Driver Booster

  • Click here to download the latest Driver Booster 6.
  • Double-click the downloaded driver_booster_setup.exe to start the installation.

Uninstall Driver Booster

  • Windows 8 & earlier:
  • Open Start > Click Control Panel > Click Uninstall a program > Find Driver Booster 6 and click Uninstall > Follow the on-screen prompts.
  • Windows 10:
  • Open Start > Click Settings > Click System or Apps on the Settings menu > Select Programs & features or Apps & features from the left panel > Find Driver Booster 6 and click Uninstall > Follow the on-screen prompts.

Activate Driver Booster PRO

Note: A valid license key is required to activate the PRO version. You can click here to purchase one. Already have one but forgot? Go here to get it back.
Click the key icon icon at the bottom right of Driver Booster 6 interface, COPY & PASTE your license code into the box, and click the check icon icon at the right side. Or visit here for step-by-step activation guidance with screenshots.
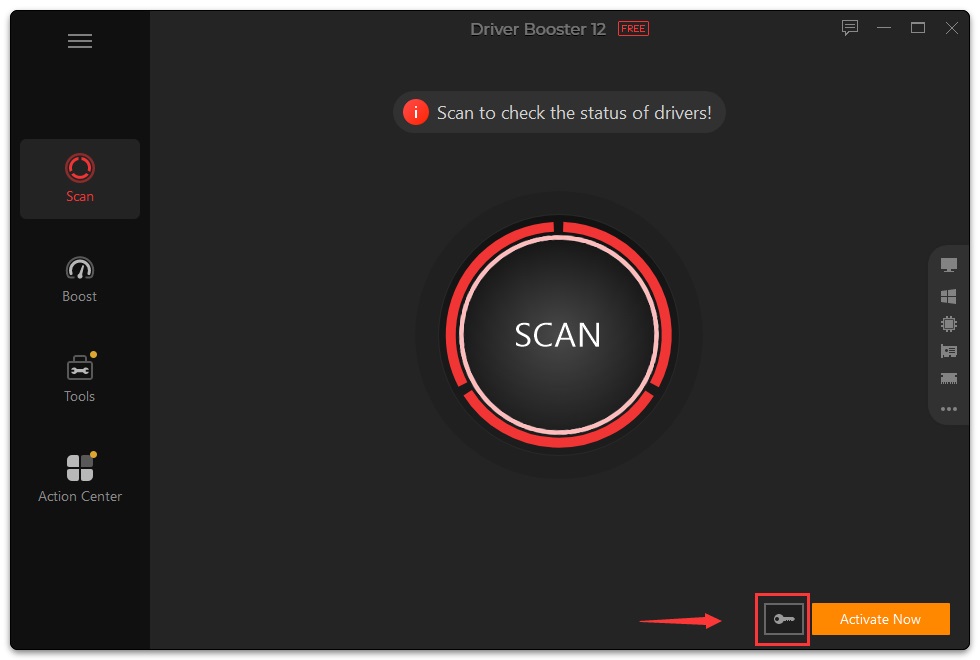
where to enter code

Update Driver Booster

PRO users can always enjoy the latest version automatically with the Update automatically checkbox ticked by default in the Settings. FREE users can manually update Driver Booster 6 with either of the options below:
  • Click the options icon icon on the top left and select Check for Updates.
  • Right-click the icon in the system tray icon in the system tray, and select Check for Updates.

Glance at Main Interface

When opening Driver Booster 6, you will see Driver Status of the last scan and an eye-catching SCAN button.
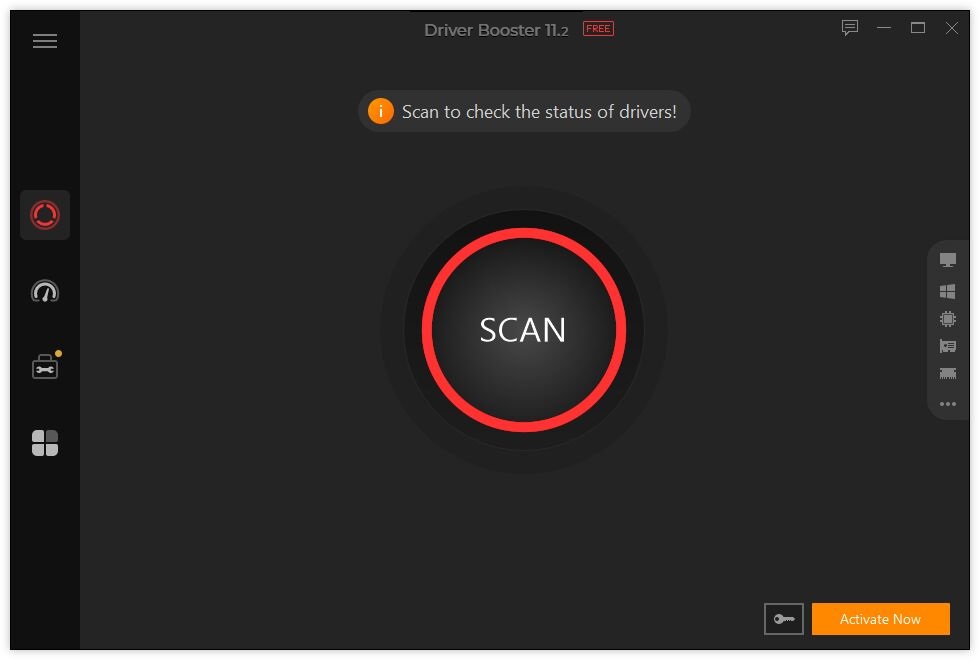
main screen of free version
Driver Booster 6 supports updating the following:
  • Device Drivers, including Graphics Driver, Audio Driver, Network Driver, Chipset Driver, and Printer Driver.
  • Game Components, including PhysX, DirectX, VCRuntime, Unity Web Player, Adobe Flash Player, Java SE Runtime Environment, and OpenAL, which provide games with necessary support, effect enhancement, and performance tuning.
Note: Game Component update is only available in the PRO edition. So if you are a PRO user, you may see Game Components outdated and can update them to the latest versions.
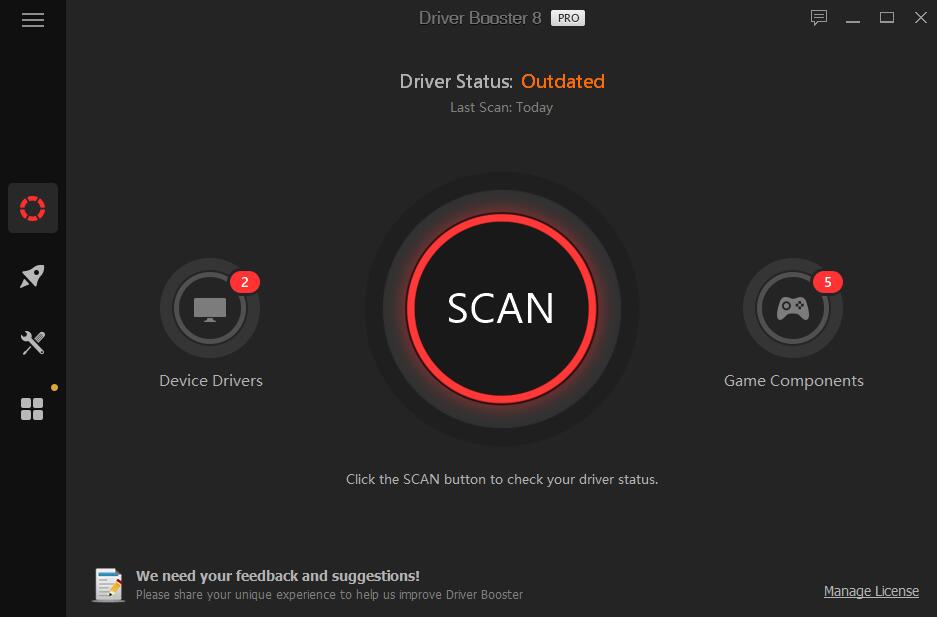
main screen of pro version

Scan / Update

Driver Booster 6 can assist you to update the outdated drivers effortlessly. Read the following introduction of Scan for Drivers, Scan Result, and Update Driver to know how it works.

Scan for Driver Updates

Click SCAN to start. You can STOP the scan and re-scan at any time you want.
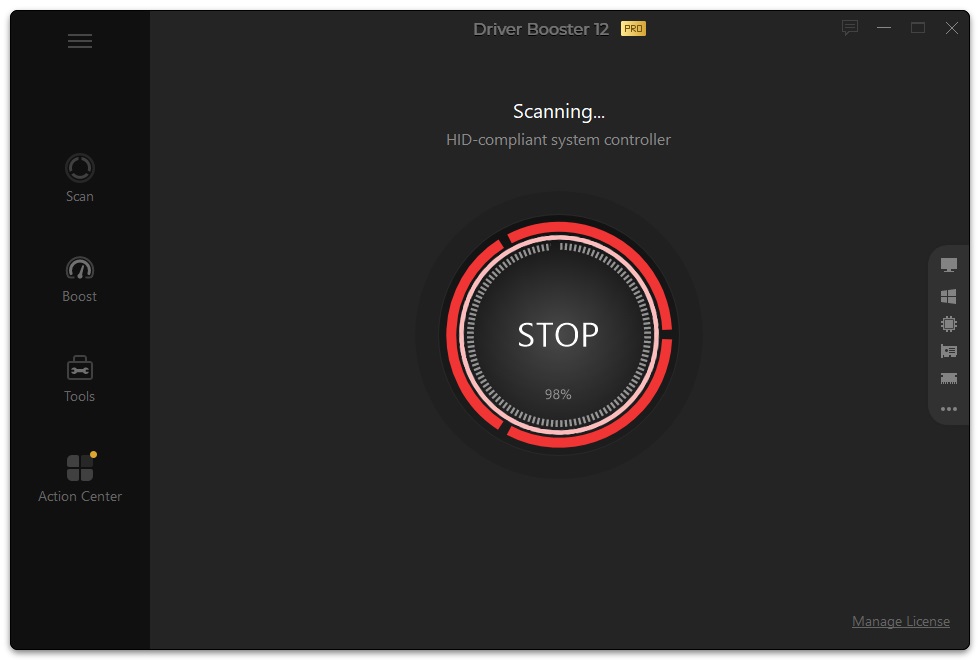
scanning screen
Note: By default, Driver Booster 6 scans automatically when it's launched. Go to Settings to disable automatic scan if you dislike it.
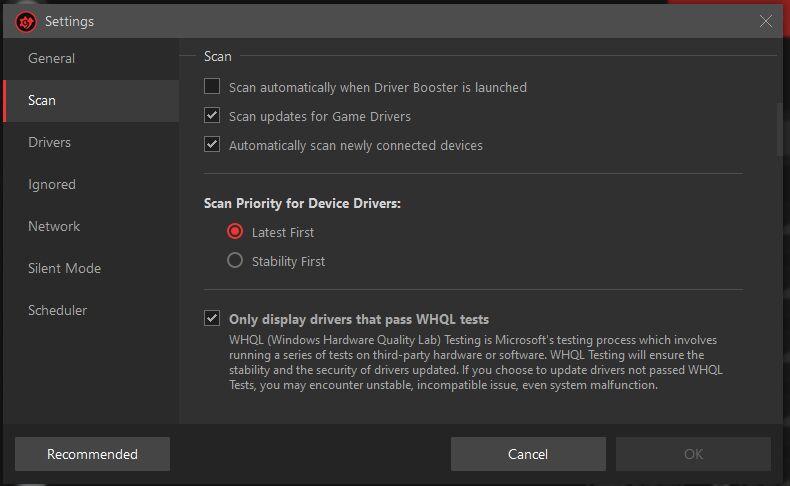
auto scan settings

Scan Result

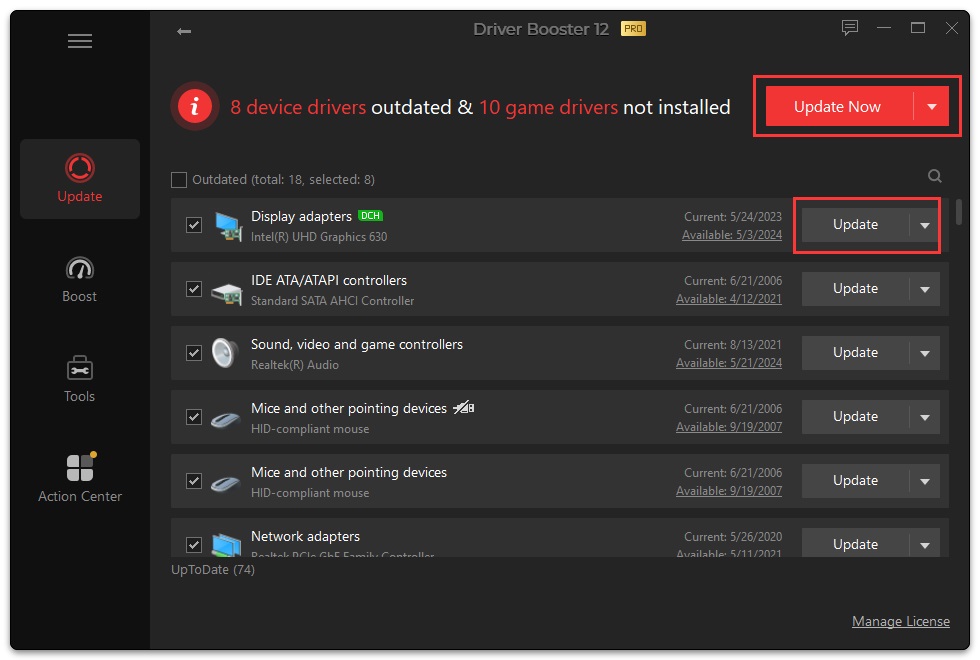
You can see the total quantity of outdated device drivers and outdated game components that need to update in the top of the scan results screen.
Scan result depends on your PC condition. And Driver Booster 6 scans for 4 issues:
  • Outdated drivers, dates of both the current version and available version are provided.
  • Missing drivers, the current status is "Missing Driver".
  • Faulty drivers, the current status is "Faulty ".
  • Not installed game component, the current status is "Not Installed".
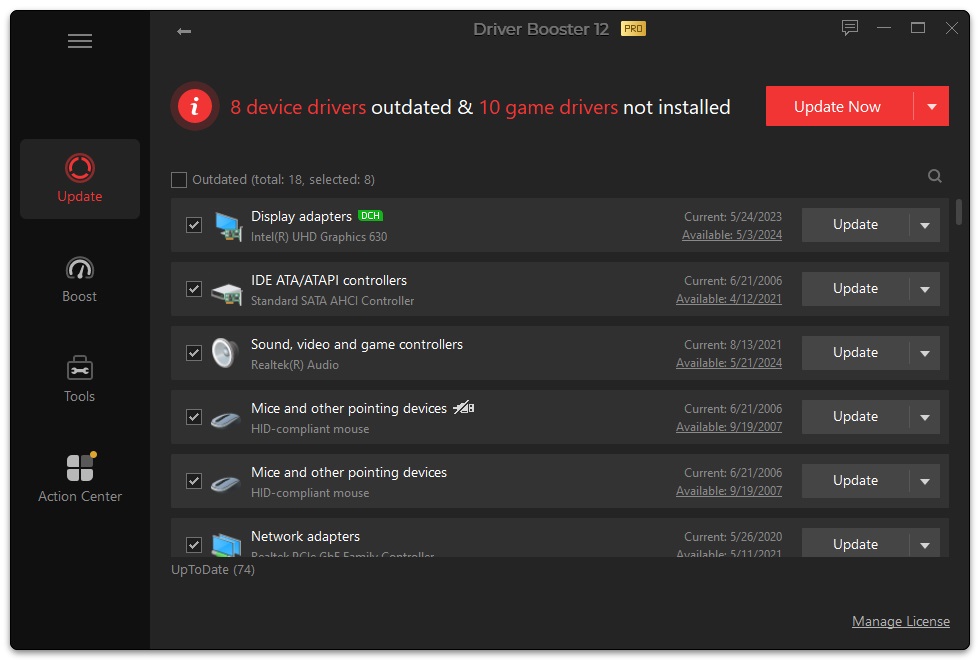
scan result of driver booster

Update Drivers

You can follow either of the methods below to start the update:
  • Click Update Now on the top right to update all selected drivers.
  • update all drivers
  • Click Update at the right side of each driver line to update drivers one by one.
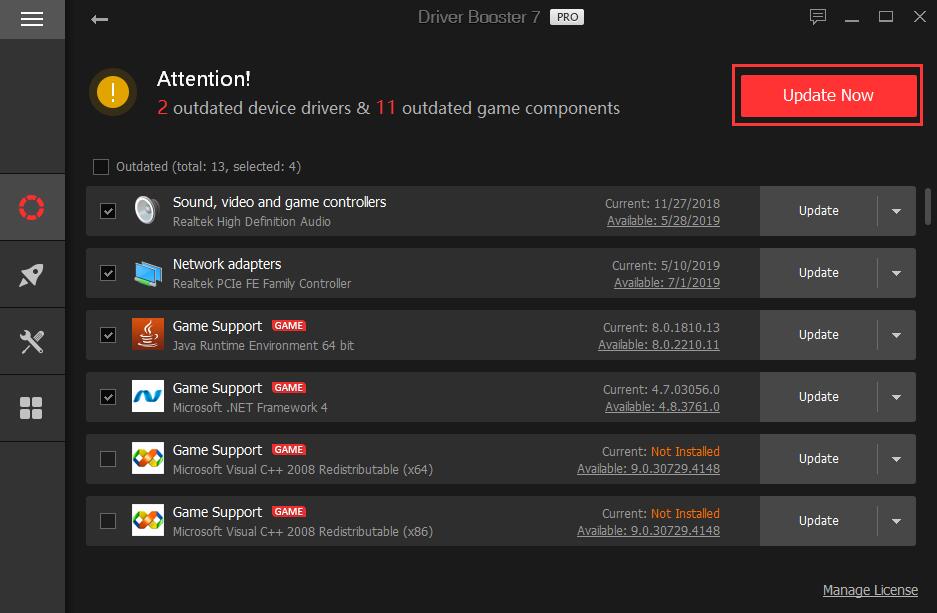
  • update driver
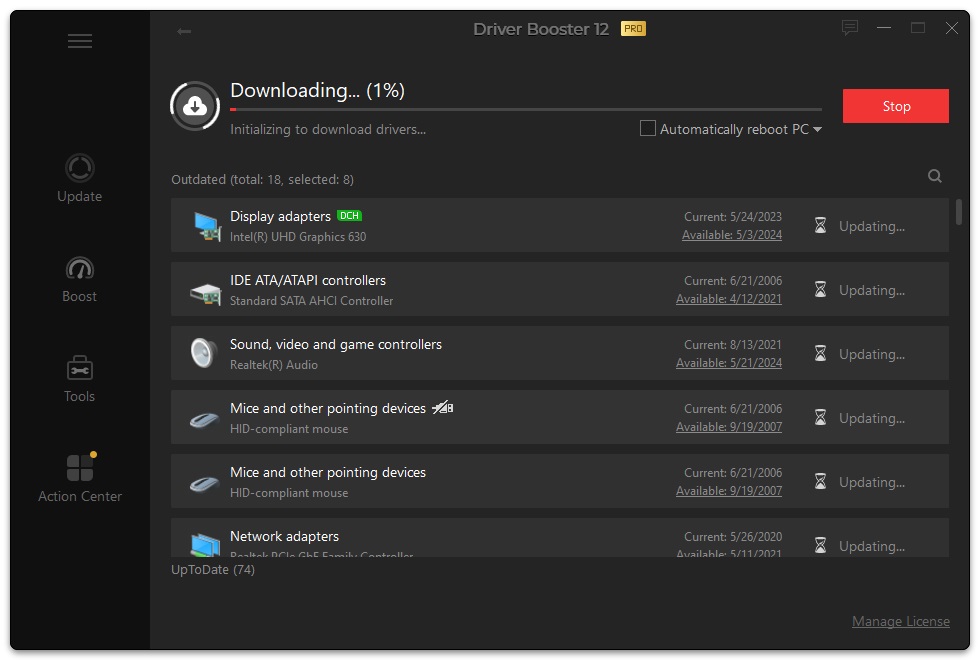
Generally, there are 3 stages for driver update:
  1. Download drivers. With breakpoint resume technology, you are allowed to stop anytime and it will continue the download next time instead of starting over again.
  2. Create a restore point ('Automatically create a system restore point before a driver is installed' is ticked by default in Settings).
  3. Install the downloaded drivers.
updating
Note: For PRO users, there may be one more stage – automatically back up a driver before it is installed. Check it in Settings:
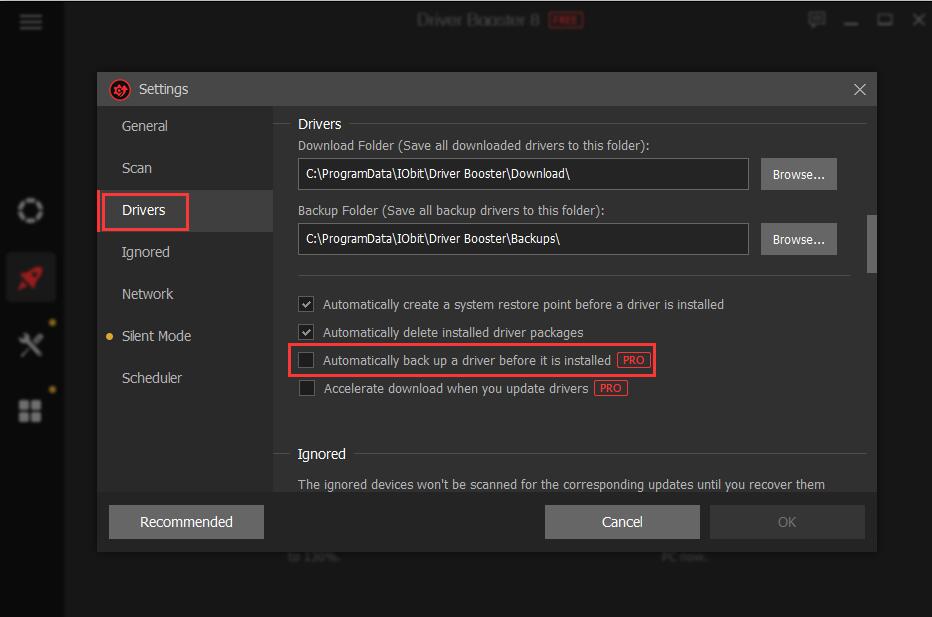
auto backup settings
The time needed for the update depends on driver size and download speed. You can choose Automatically reboot PC or Automatically shut down PC on the updating screen, and click the minimize icon icon on the top right to minimize the whole window, then leave it and forget it. After it's completed, you will get a countdown message to reboot PC or shut down PC accordingly.
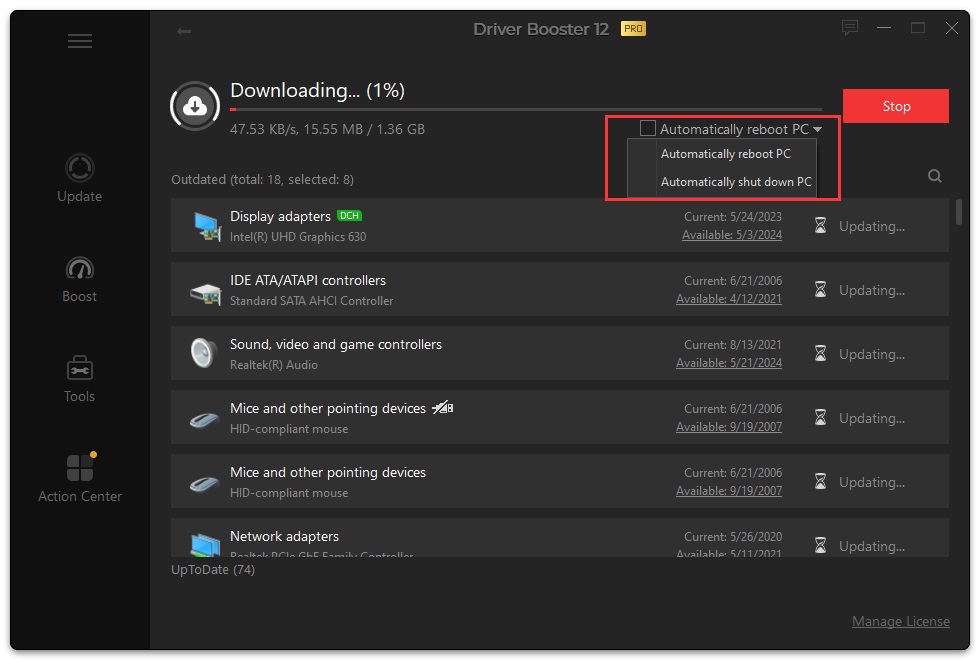
auto reboot or shut down pc options

Boost

Driver Booster 6 adds a new module Boost which offers two features: Game Boost and System Optimize.

Game Boost

Game Boost stops unnecessary apps/services to help you get a better gaming experience.
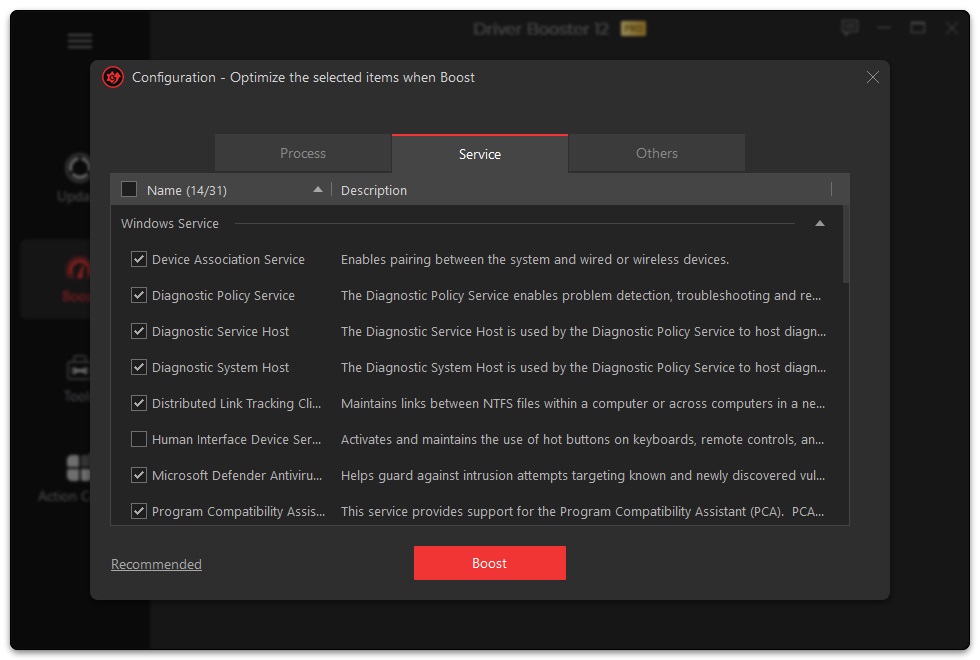
In Game Boost Configuration, some unnecessary services/processes are already selected by default, so you only need to click the Turn On button to end them and boost your computer for better gaming. Or you can click the Configure text link and select the items you want to end to boost your game performance.
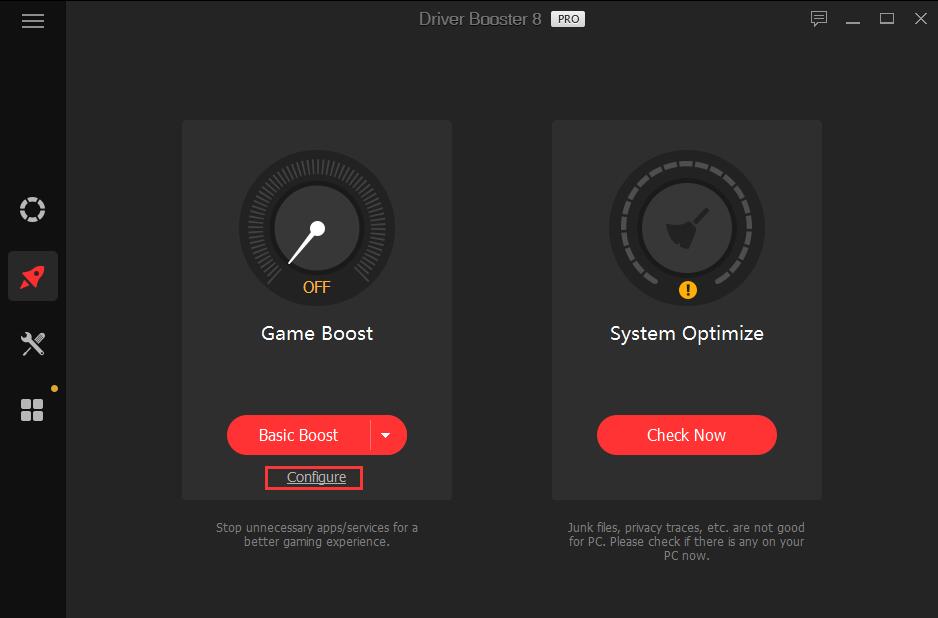
configure game boost
configure boost detail
After the boost, you can click Details text link to view all the stopped processes/services/apps. And you can click the Turn Off button to turn off Game Boost at any time.
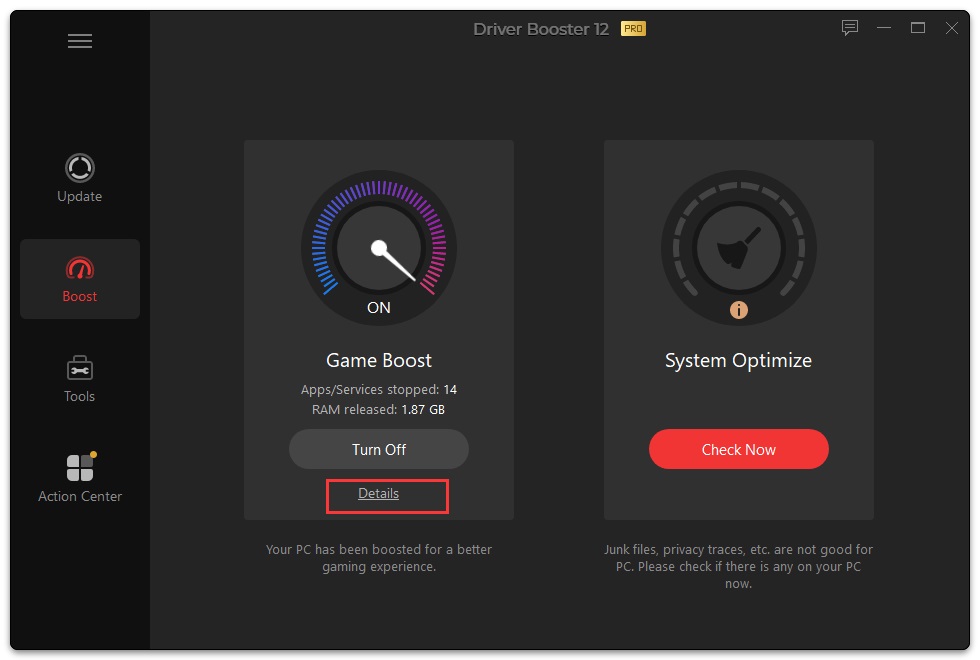
details about boosted processes

System Optimize

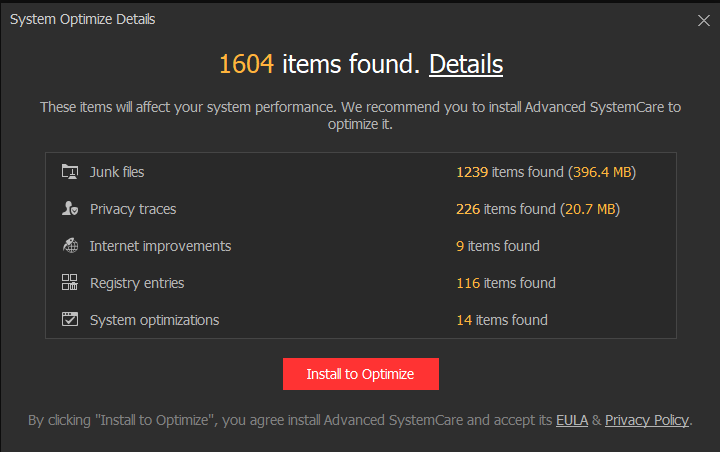
System Optimize helps clean up junk files, privacy traces and redundant registry entries, optimize your internet speed and system with the all-in-one product Advanced SystemCare.
If you haven't installed Advanced SystemCare yet, clicking the Optimize button will guide you to install Advanced SystemCare for further optimization.
Or click the Details text link to view all the items can be optimized. And click the Install to Optimize button to install Advanced SystemCare to optimize them.
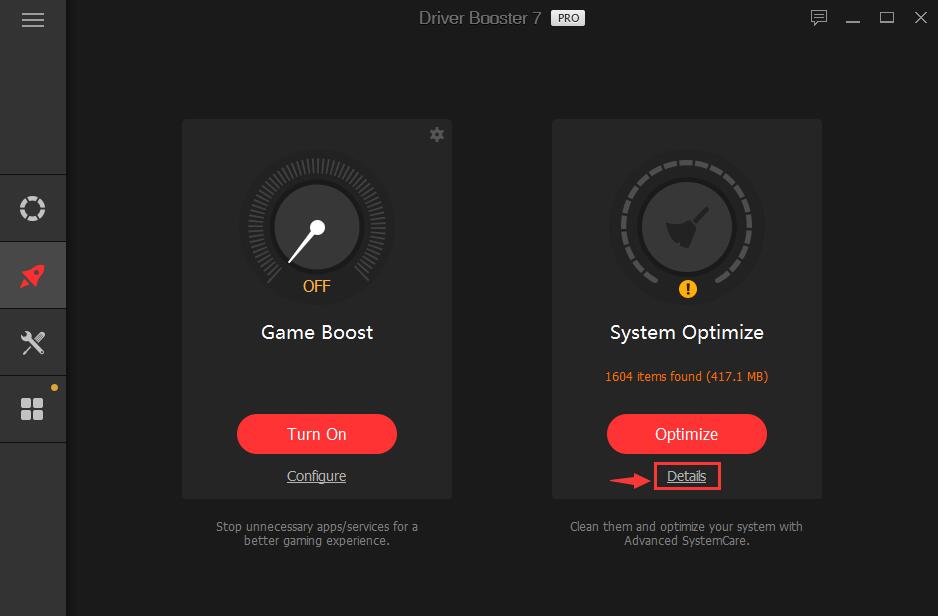
system optimize details link
preview system optimize item
If you've already installed Advanced SystemCare, you can click the Run Now button to optimize your system with Advanced SystemCare.
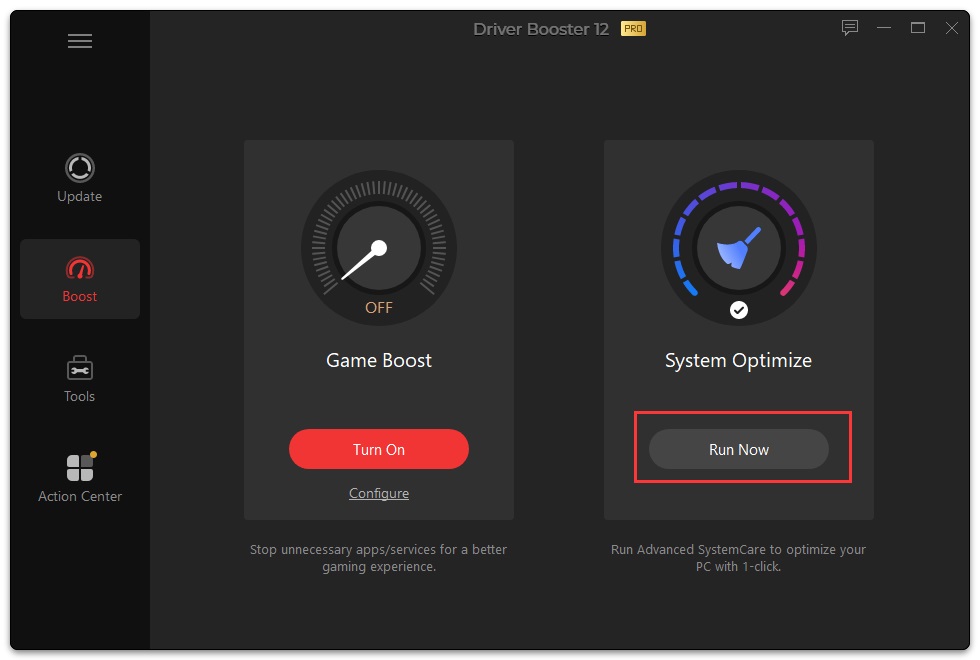
run advanced systemcare

Tools

Driver Booster 6 provides you with 7 useful tools: Rescue CenterFix No SoundFix Device ErrorFix Network FailureFix Bad ResolutionClean Unplugged Device Data, and System Information.
These tools can help detect and fix some common problems like no sound, network failure, wrong resolution, clean unplugged Device Data, and check the system & hardware information. Besides that, the tool Rescue Center can backup drivers, restore your drivers and restore your system to a previous good status. You can use these tools anytime by clicking the icon tools tab icon on the left side of the main interface and clicking the tool you need.
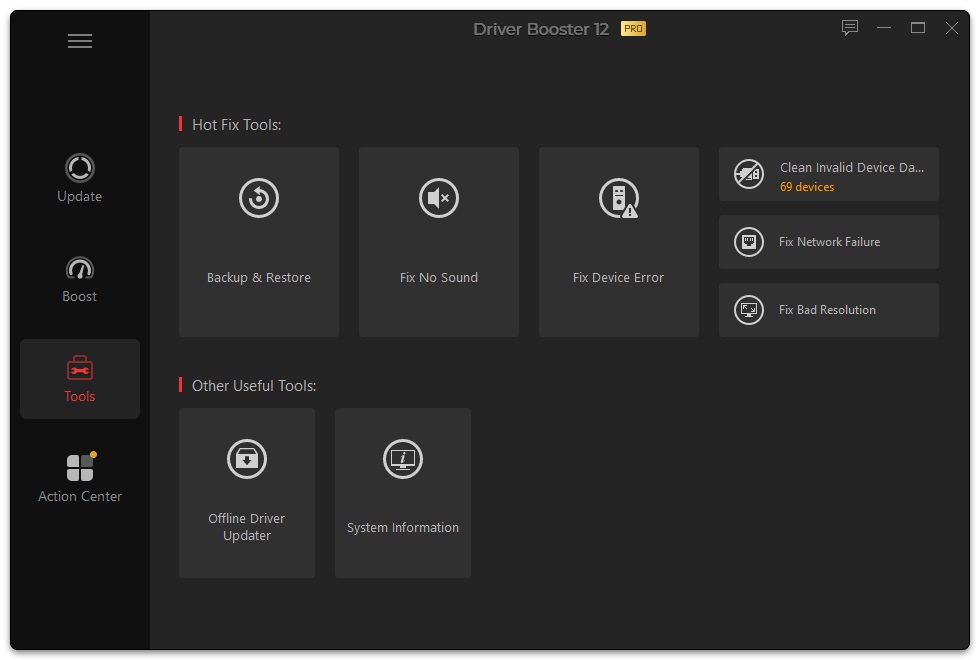
tools in driver booster
Note:

  • The tool Fix Device Error is only available for PRO users.
  • Unplugged devices are those flagged with the unplugged icon icon in the driver list, which means they are not plugged into your PC at this moment. It is not a 'problem' and needs no 'fix'. But, if you are sure you won't use them anymore, click the drop-down menu icon button, and select Uninstall to uninstall them one by one.
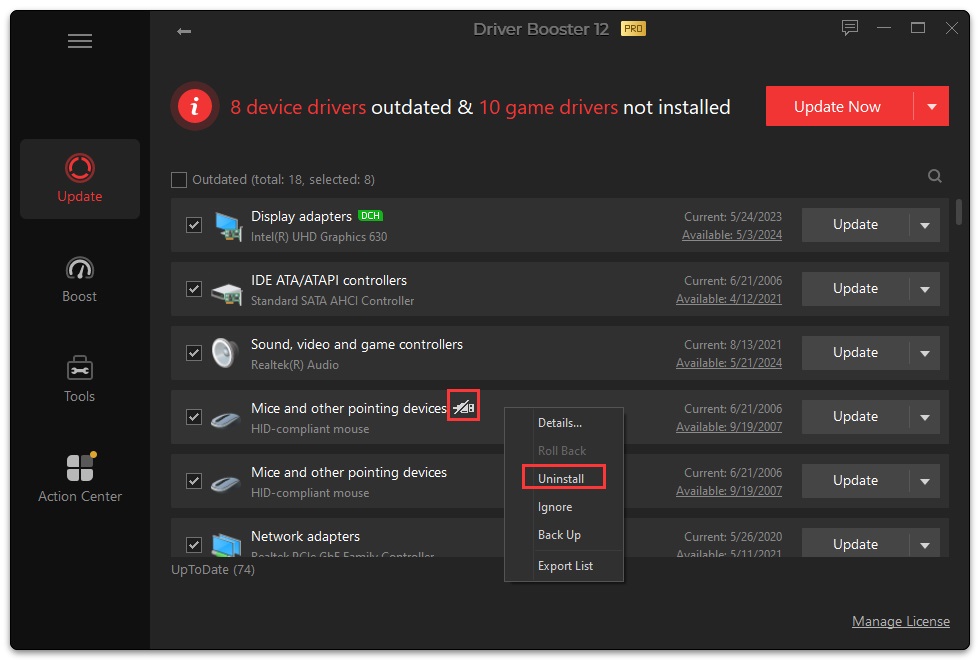
  • uninstall unplugged device

  • If there are too many good-for-nothing unplugged devices, you can click the tool Clean Unplugged Device Data to remove the unplugged devices' data in bulk. You can also click the Ignore text link to keep the device data and clean the rest by clicking the Clean button.

  • Note: Clean Unplugged Device Data will remove the unplugged device data only. The unplugged devices are still installed on your computer. When you plug them again, you can use them without any problems.
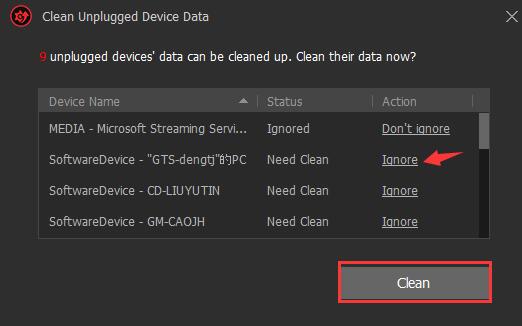
    clean unplugged device data

    Action Center

    Click the action center tab icon to open Action Center and learn more about how the other recommended well-known IObit products can help you with your computer. If you haven't installed them yet, it's strongly recommended that you click the Install now button to install them.
    If you are using Driver Booster Pro, you can also find an exclusive offer for Driver Booster Premium users only to purchase other IObit programs and IObit trusted Partners' products at a very considerable discount here.
    Note: Clicking Hide at the top can keep the recommended programs out of sight if you are not interested in them.
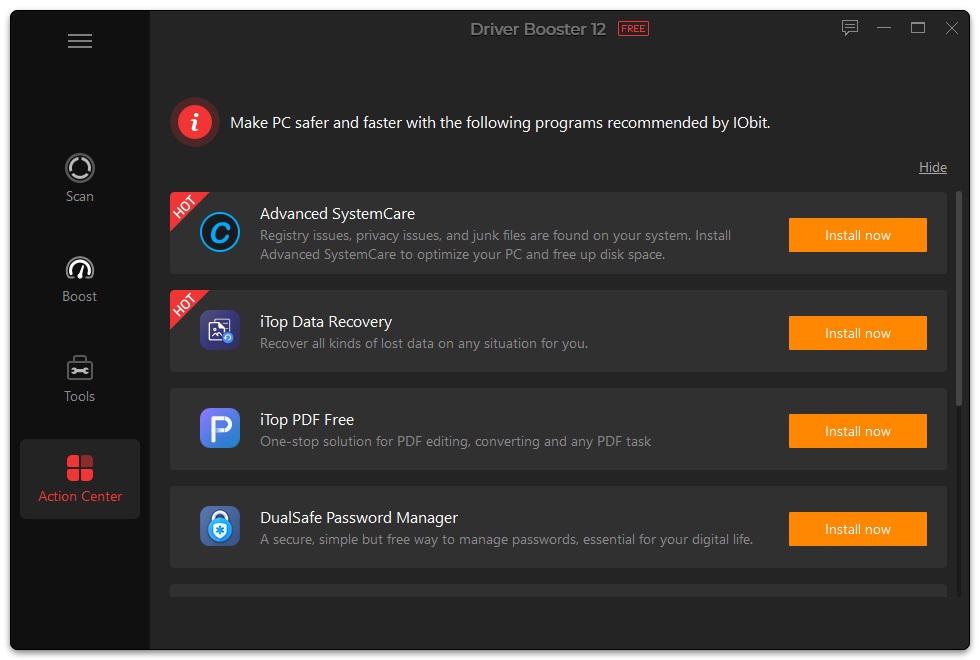
    action center

    Auto Driver Update

    Note: Auto Driver Update is a PRO exclusive feature. You can check it in the Settings.
    If the 'Automatically update drivers while the system is idle' option is ticked, Driver Booster 6 will automatically 'download' the updates or 'download and install' the updates in the background when your system is idle.
    If you tick the 'Download and install driver & game component updates' option, you can also select the types of drivers which you want to update automatically.
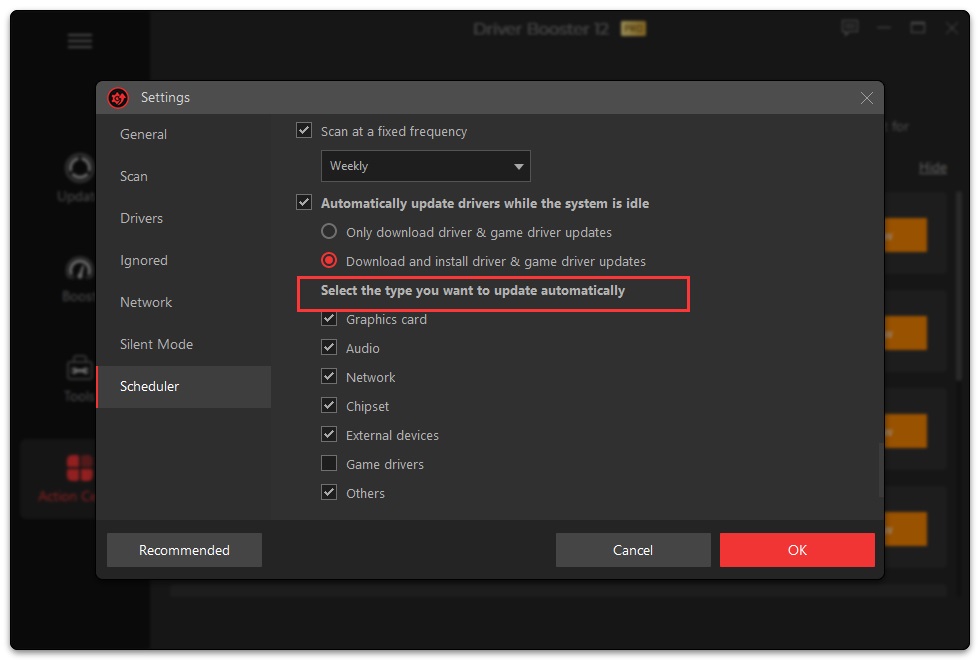
    auto update when the system is idle

    Restore Driver Updates

    To minimize the bad effect of any unexpected issues caused by driver updates, Driver Booster 6 provides 3 strategies for easily repair: Driver Roll Back, Driver Backup and Driver Restore, System Restore.

    Driver Roll Back

    In the scanning result window of Driver Booster 6, you can click the drop-down menu button at the end of every listed outdated driver, and select Roll Back if it is available to roll back the driver to its previous version.
    And you can also click the version link (Available or Current) to open Drivers Details window to check whether you can roll back the driver to its previous version.
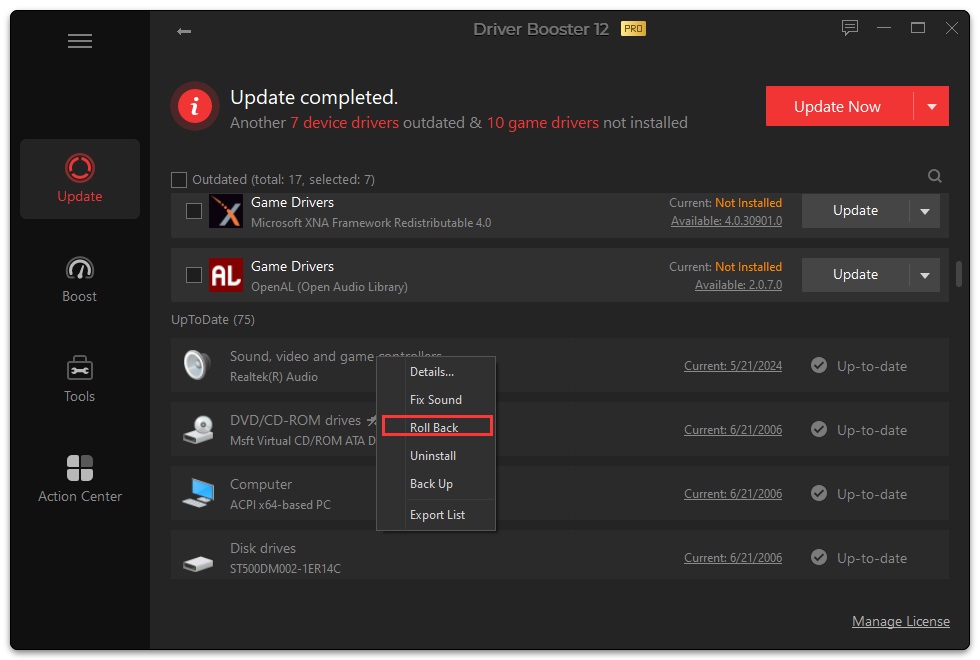
    roll back options
    roll back option

    Driver Backup and Driver Restore

    Note: The function of Driver Backup works for PRO users only.
    Click the tools tab icon icon on the left side of the main interface and open Rescue Center. If there is any driver version available for backup, it will be listed under Driver Backup tab. To back up them, just tick the checkbox before them and click the Back Up button. Backup Version indicates the version you backed up for that driver while Current Version means the driver version you installed at present. If you find Current Version is newer than Backup Version, you can back up that driver again to its latest installed version.
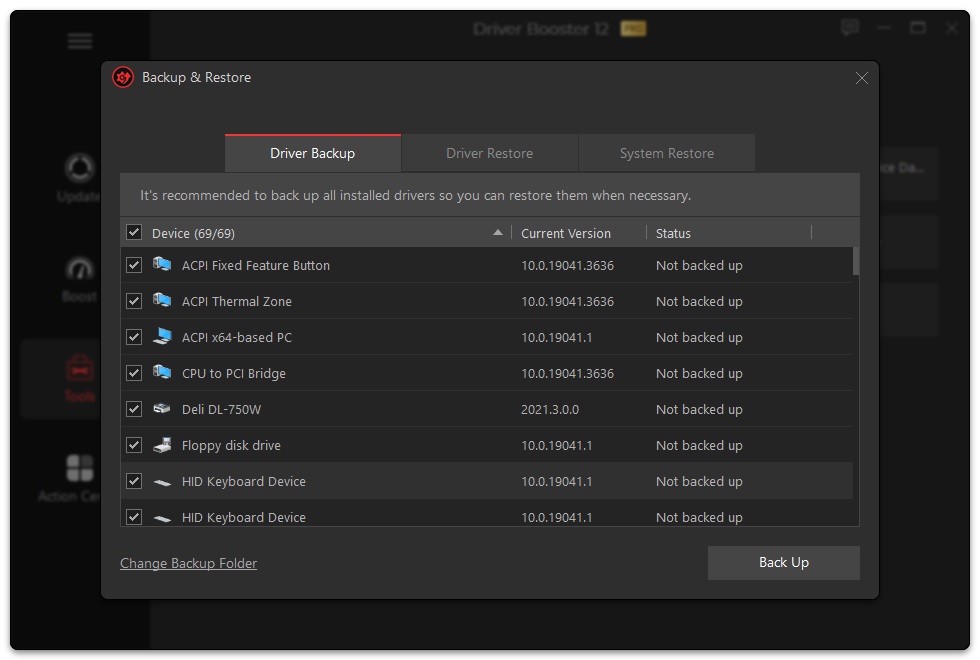
    back up drivers in rescue center
    In Driver Restore tab, you can select the driver you want to restore and click the Restore button to re-install the backed up (the previous) version.
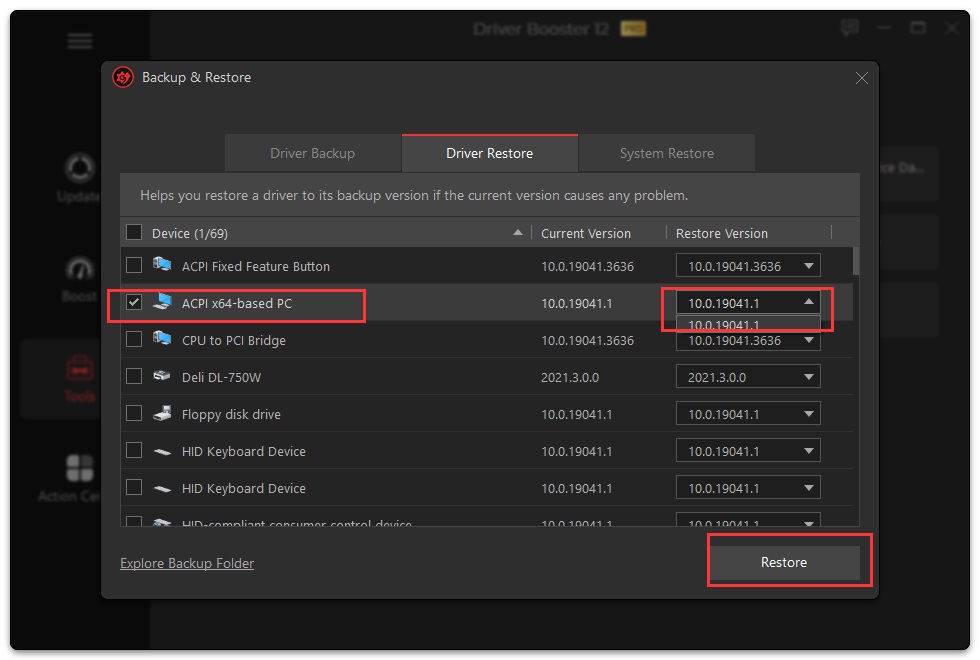
    restore driver in rescue center

    System Restore

    Note: Restoring system will undo all changes made after that restore point. Driver Booster 6 supports manually creating or removing restore points.
    Driver Booster 6 creates a restore point before updating the driver by default. Choose a restore point according to Date and Time or Description to restore the system to the previous good state.
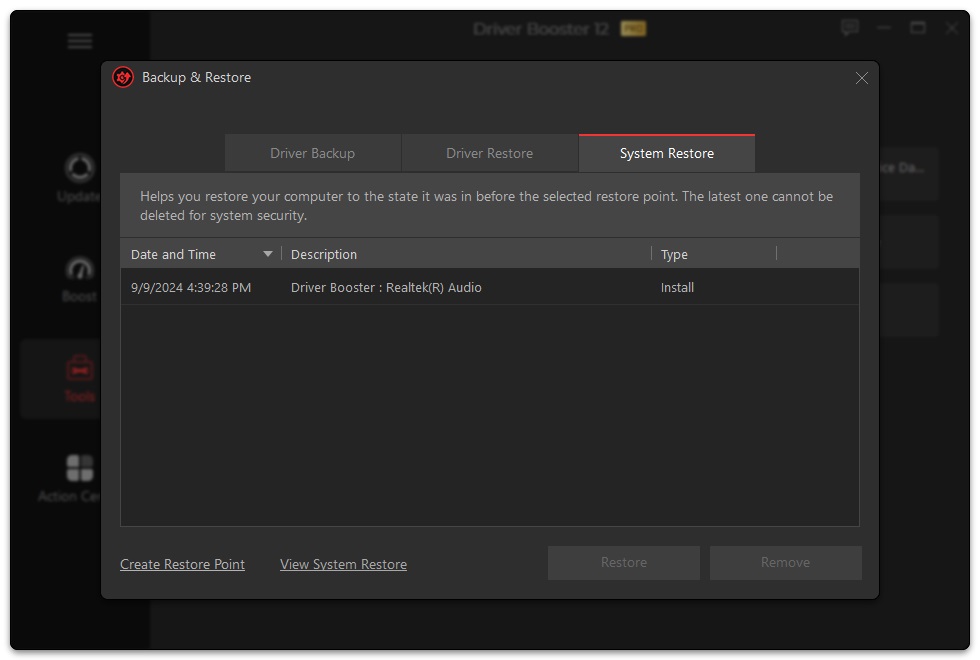
    system restore in rescue center

    Ignore Unwanted Updates

    If there is any driver you don't want to update, you can click the drop down menu button at the right side of a driver line, and select Ignore to ignore this update for that driver.
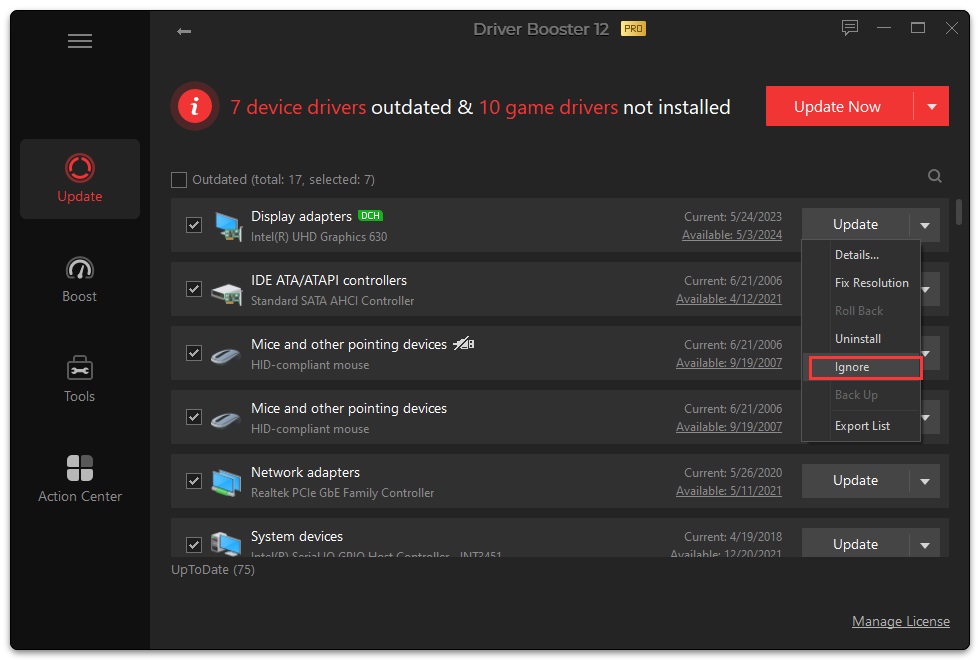
    ignore driver updates
    Note: After selecting Ignore, you will see the following confirm window. You can choose either Ignore this update only or Ignore all updates of this device.
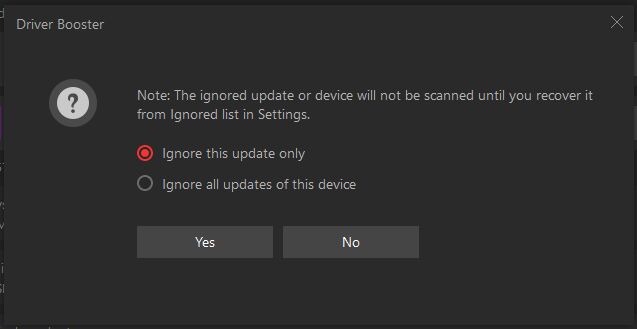
    ignore driver updates confirmation
    The ignored drivers won't be scanned for the corresponding updates until you recover them from the Ignored list in Settings:
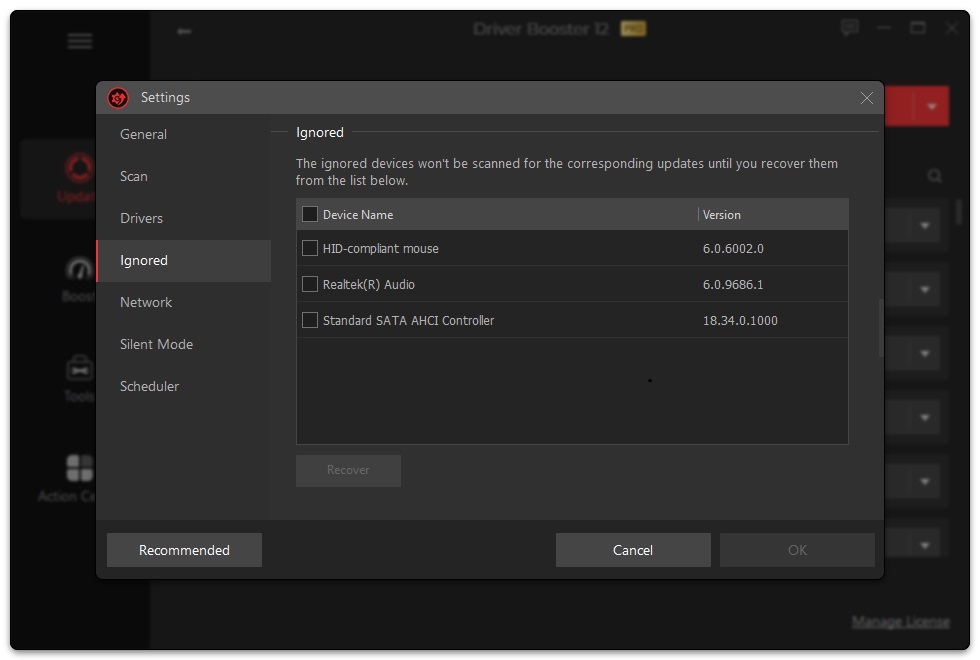
    ignored drivers in settings

    Driver Update History

    Click the options icon icon at the top left of the main interface and select Driver Update History to check what operation you did about your drivers and components with Driver Booster.
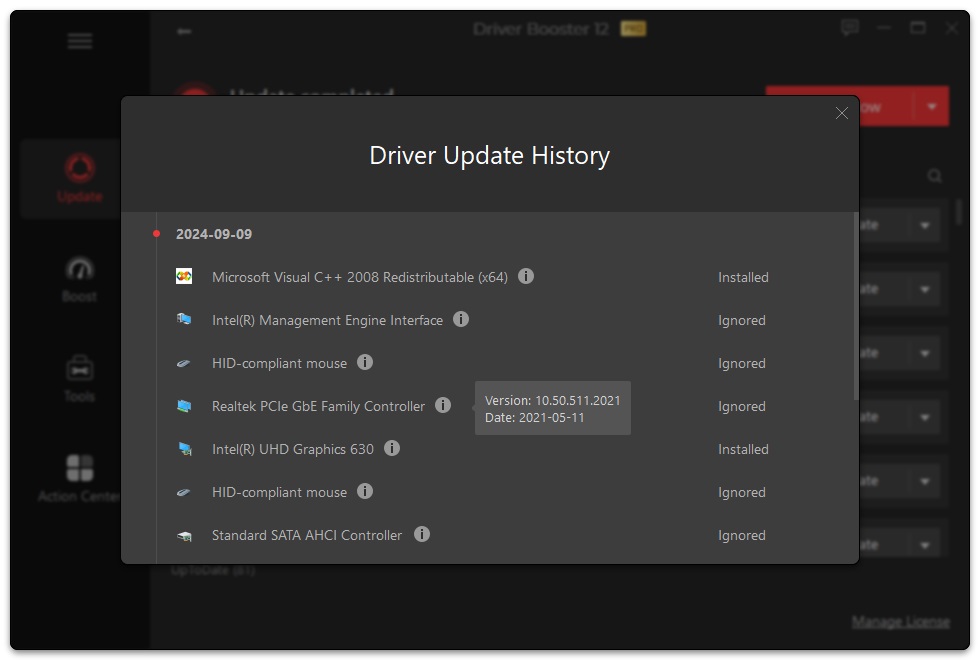
    driver update history

    Configure UI

    Click the options icon icon, you will see the Skin options at the bottom left of the popup window.
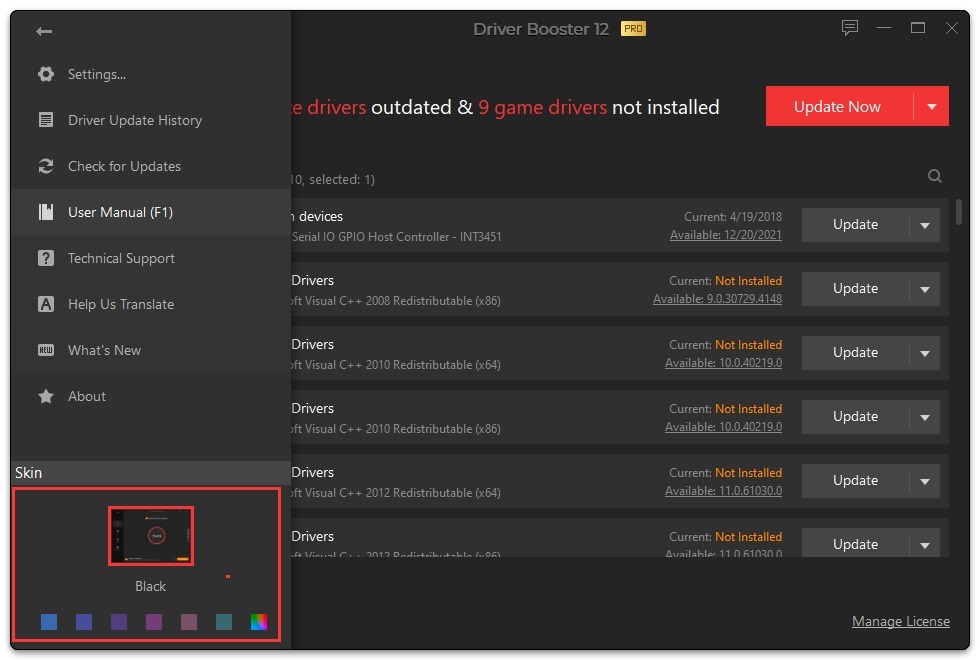
    driver booster skins
    And you can click Settings to quickly change LanguageFont Size, and Transparency under General.
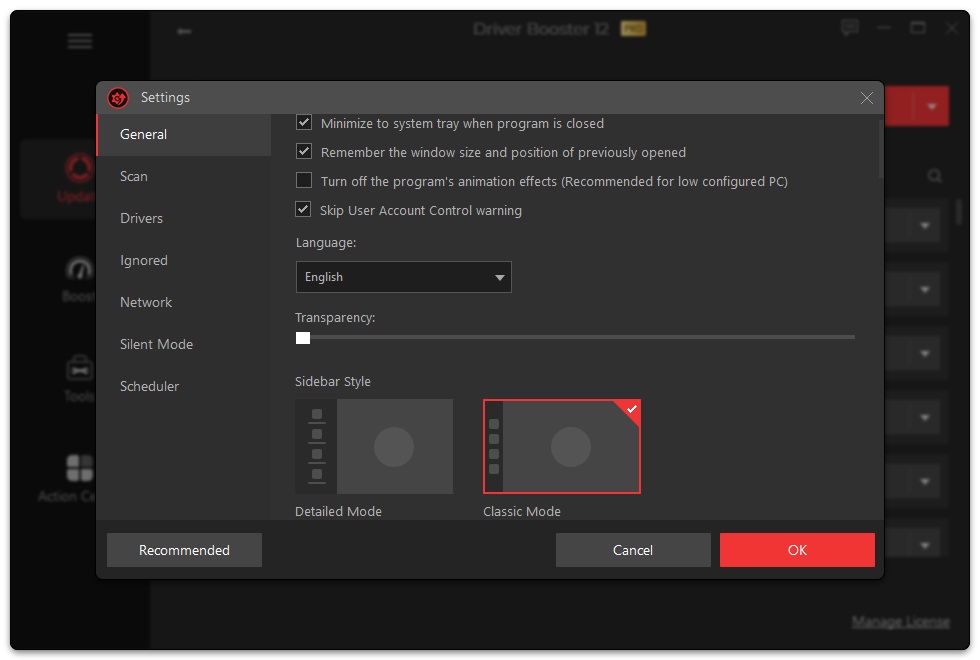
    UI settings

    Configure the Program

    Click the options icon icon, select Settings…, configure each function as per your needs, and never forget to click OK to save the changes. Clicking Recommendedcan restore to default settings.
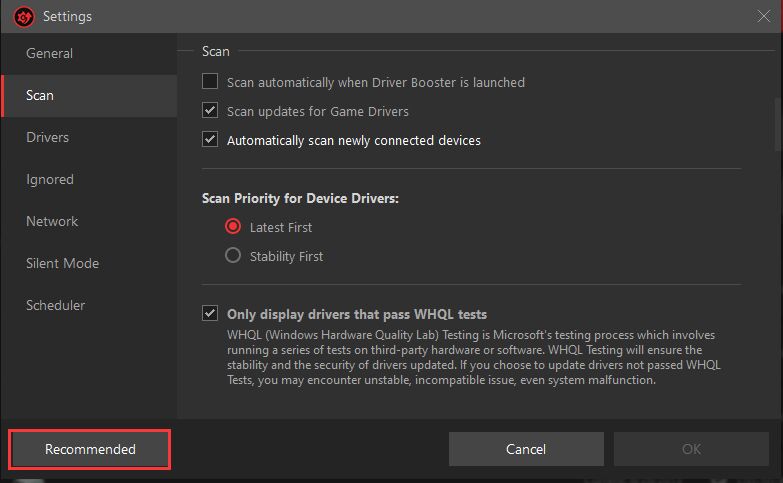
    recommended settings

    Technical Support

    Every feedback from you is valued. To ensure you can reach us in time, we provide several feedback channels:
    Built-in Feedback
    Click the feedback icon icon at the top right of the main interface of Driver Booster 6 to open the Feedback window. Make sure your Email address is correct, choose a proper Request Type, and specify your feedback in Description. Besides, it will be very helpful if you can click the screenshot icon icon to send us screenshots of the related error messages if any.

    Note: In Feedback, it will intelligently provide you with a proper solution as per the Request Type you select. The following picture is an example.
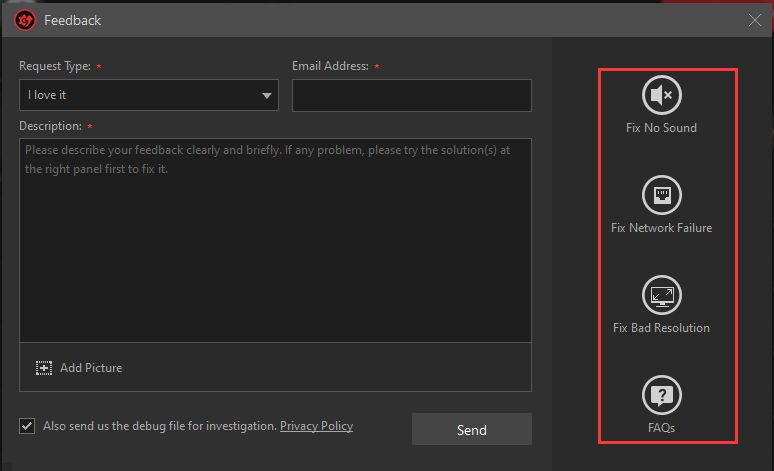
    feedback request type

    Easilly activate windows 10 with kms pico


    Free KMSpico Activate Windows 10 (Permanent) 2019 [Kmspico.info]


    If you are using windows 10 and misses the all efficient features, surely your windows 10 is not activated yet. We have some great information to share with you people about activating Windows 10 on your system. KMSpico is one of the best KMS activators for Windows 10 in the history of the computer world. If you want to activate windows 10, then move forward there.
    This activator can bring you all cool features of Windows 10, after activation for free. You should try this activator at least one time to bring trust for KMSpico

    KMSpico for Windows 10

    Kmspico is new technology that activates windows without a license key. Activation of Windows 8 is similar to windows 10. KMS activator can make a universal amplifier to use windows 7, 8, 10 and MS Office. When you are got start with Microsoft office and get the trial version, it will expire soon. But KMS-pico will give activate office for a lifetime with 0 $.
    For this tool, have no problem to activate office products, Windows 10 and 8 without having any license keys on their database. Kms-pico will be doing activation of windows 10 pro and the new version of this window like windows 10 automatic version. With our website, you can download the latest version of Kmspico to activate windows 10 fo a lifetime.

    Advantages of Kmspico

    1. Lifetime License – This is best in every way, activation of windows is similar as activated by Microsoft company. You will get windows updates like a normal window.
    2. Lifetime Activation – You shouldn’t worry about the time frame of this tool, it will give you lifetime activation for free.
    3. Safe – It is really safe tool for your use.
    4. Supported – It supports both versions of windows 32 bit and 64 bit.
    5. Clean – This is clean software without any bad malware and virus.
    6. Free of cost – KMS will never ask you to put money.
    7. Updates – If in future there will be new windows, we will upgrade the kmspico for you.
    windows 10 activated

    Kmspico for these Devices

    Win 8, 7, 8.1, 10 (Vista too) and all office products (MS 2010, 2013) that can be activated. There are many links to download kmspico activator. Most of sites are full of malware, they are not safe to download. We will provide you best source to download the latest version of KMS-pico activator that is of course for free.
    Be aware of other websites, Our files are clean and free from Malware.
    Pass: kmspico.info
    If Activator Does not work: Use: Windows 10 Activation with CMD >>
    (Special Message by Kmspico.info Admin) If you are getting any problem to install it, feel free to send us a message (using contact us page) or visit Homepage to learn the full process.

    Alternative Windows 10 Activators:

    1. Microsoft Toolkit:

    Windows 10 is not free for anyone, needs some money to pay Microsoft to get keys to activate windows completely. But, MS Toolkit gives you the opportunity to activate wins 10 for free, just download and activate it.
    Here we have the finest activator for Windows 10Microsoft Toolkit has some other versions but this is the latest one. It has enhanced features and provides better security compare able with any other software.
    List of some of its key aspects is given below:
    • It is convenient due to its two activation methods.
    • It is secure because it is virus protected. It has no malware or any other harmful codes.
    • It has an improved version of WinDivert
    • AutoRearm Uninstaller option is available also for those who already installed AutoRearmin their systems.
    • It has a built-in product key checking So you can verify key as it has no chances of any mishap by fraud or early expiry of Windows.

    2. KMSAUTO

    KM-AUTO is created by Microsoft, old and worthy tool for activation of windows 10 pro. Which is also known as Universal activator KMS auto, can activate any kind of windows and MS office.  KMS Auto – one of the oldest and best activators created by Microsoft for activation of absolutely any Windows system, it will automatically create the schedule in the task list in order to have your Windows 10 automatically reactivated after the key expired. We have tried this tool and found very lethal for activation of any operating system and office 2016, 2013, 2010.
    Here we have the resourceful activator for you! The KMS Auto Net which can be used to activate Windows 10. It can also be used to activate the previous versions of Windows. People using this software can get access to the full features of Windows.
    Are you interested in this helpful tool! Let’s take a look at its features:
    • It provides permanent activation solution for Windows.
    • It can automatically diagnose multiple PC issues and eliminate them during the activation time.
    • It is easy to understand, easy to install due to its GUI interface
    • KMS Auto Net never consume much time; just your few clicks are needed and your window is activated.
    • 100% virus free. It has no malicious content.
    The main objective of this software is to facilitate users. It keeps them up-to-date with the latest updates in Windows.

    3. Re-Loader

    Another most reliable tool to get your Windows 10 working. Re-Loader is as simple as you push a tinny button. It works well with all the versions of Microsoft products. Why PC users prefer it? The answer is due to its automated nature. And users are reporting it as the most suitable software for Activation.
    Here we have a list of key features of the software:
    • Working with the same efficiency level with 32 and 64 bit operating systems.
    • The reliable one because it is free from Trojans and
    • Can work offline as well as online with no effect on the speed of the activation process.
    • Have a user-friendly interface which is easy to use. So it is convenient and adaptive.
    • It ensures lifetime activation for Windows.

    4. KMS Daz Activator

    Here we have another choice of activator for you! It’s the KMS Daz Activator. It provides a permanent solution for Windows activation problem. However, it requires a slight change in your system; which is the disabling of anti-virus to complete the activation process. Remaining activation steps are same as the above discussed in other activators.
    Here we have a list of attributes of KMS Daz for your convenience:
    • The best thing about KMS Daz is that it automatically enables the Windows update As well as it activates the Media Centre.
    • It’s designing based on the new license injection and registry path algorithms.
    • 100% virus free. It has no viruses, Trojans, and
    • Another important feature is its GUI Due to which it can be easily understandable by a newbie.
    • The user can do activation both offline and online.
    • It supports all version of Windows.

    5. KMSPico 10.2.0:

    KMSPico is one of the best activators that are currently available to activate the latest version of Microsoft products such as Windows version 10 and Office 16KMSPico is a legitimate service that Microsoft offers to its user for activation solutions and it is used to activate volume licensed Microsoft products. Are you wondering about the activation process? KMSPico activates windows by replacing its installed product key by KMS server. Don’t worry! It is a totally safe process and provides genuine and permanent activation.
    Some characteristics of this amazing activator are listed below:
    • No tension about the expiry Download it and then there is no time limit for its use. You can use it anytime you want. So, we can call it a timeless software.
    • No fatigue of confirming the windows versions. It is compatible with both; if it is 32 bit or 64 bit.
    • Another important thing that must be considered is security. Is this secure? Oh! Yes! Designers and developers claim it provides 100% It has no viruses or any packs of risky codes.
    • The most beneficial thing is it takes very much less memory of system e.g. 5MB. Can you imagine it? Such an extensive service with the little memory utilization!
    • It is multilingual, so anyone in any part of the world can use it.

    How to Activate Windows 10 with KMSpico:

    We have been learned from this article, that KMSpico all most supports to all Microsoft applications including windows and Office. We try to make things very simple for our readers, so here are a few steps to get accuracy.
    • first of all, Turn off all protection software including anti-virus and firewall to get download start.
    • Download Activator from the above given link.
    • Run the application, it’s opprobriously automatic.
    • Restart PC – Message will appear.
    • You have activated.
    All of the above-discussed activators are doing their jobs with excellence. However, their activation processes and layouts are a bit different from one another. Help manuals are available with these tools so there are no hurdles. Use these tools only for the activation of licensed windows. Keep in mind that all these activators are related to Microsoft and it is just like they are supervising these tools. Download any one activator according to your choice and enjoy the results.

    easily activate office with kms auto lite

    Installation Instructions
    1. Temporary disable your antivirus software. (IMPORTANT! Otherwise KMSPico will be unable to modify Windows Registry entries that activates the Windows/Office)
    2. Download KMSPico From Here (Backup Link 1 | Link 2)
    3. ZIP Password – 123
    4. Run KMSPico installer. (If you see Windows Protected Your PC message, click more infoand choose Run Anyway option.)
    5. Complete the installation and wait for KMSPico to run automatically.
    6. Press the red button and wait for the success message.
    7. Done!
    For Windows 10 Users

    Windows defender now blocks KMSPico. If you experience this problem, please disable Windows Defender Real-Time Protection to download KMSPico!

    Mar 10 2019 Update:
    Fixed all bugs of KMSPico Portable version and mirror links were updated. No more “Server Error” problems again!
    Aug 1 2015 Update:
    windows 10Windows 10 activation is now supported. Home, Pro and Enterprise versions are fully supported. Also you don’t need to worry about Windows updates. Our tool will take care of them. Enjoy!
    smartscreen
    Oct 2014 Update:
    If you’re getting “Connection Timed Out” or simply nothing happens after clicking above download link, please use following mirror.
    Mirror Download Link

    easily link mpesa to pay pal

    By now you must have heard that it is finally possible to officially transfer funds to and from PayPal using Safaricom’s popular mobile money transfer service M-Pesa. Read the official announcement here.
    The development, after years of many in Kenya’s burgeoning freelancing space being held captive by the exorbitant rates charged by third parties and the lengthy 3-day period it takes established players like Equity Bank to process transactions, should come as a relief to many.
    Personally, I am beholden to PayPal for two reasons: I am an avid gamer and since Kenya is not one of the few countries that are classed as PlayStation Network (PSN) regions, I usually have to top up my PSN wallet using vouchers for the respective countries I have chosen to associate my account with and, most of the time, the only place to find good PSN voucher deals is online. On places like G2A. Over there, I use my PayPal to make those purchases. Since I run this blog as well, I use PayPal to pay costs related to operating it, like domain fees and whatnot. It’s convenient. Most important of all, I use PayPal to receive payments for a lot of the work I do online. As such, PayPal is directly responsible for my levels of happiness on any given day since because of it, I am able to have some recreation (gaming and taking people out 🙂 ) as well as make money, which I need if I am to be alive to write the next article.
    Just like it did for the ability to buy apps on the Google Play Store using M-Pesa, Safaricom has partnered with a third-party, TransferTo, to make the PayPal linkage possible. According to the FAQ page on PayPal’s mobile money website, TransferTo “is a B2B (business-to-business) mobile payment network connecting financial institutions and mobile operators globally”.

    How to link your PayPal account to M-Pesa

    First things first:
    • You need to have a PayPal account. If you don’t have one, sign up for one (link) then come back once done.
    • The PayPal account must be Kenyan. I have friends who registered their PayPal accounts while studying in the United States and were up in arms asking why their M-Pesa account wasn’t going through. Have that in mind when initiating the process.
    • Make sure that the name you used to register for your PayPal account is also the same one you used to register for M-Pesa. Failure to have the names matching will result in the process to sync the two accounts (PayPal and M-Pesa) failing. As of this moment, I don’t know what needs to be done in light of that happening.
    Then…
    • Click this link.
    • You will be prompted to log in to your PayPal account. Do it.
    • Agree to the terms (make sure you read them since these are about how your data is shared).
    • Enter the phone number linked to your M-Pesa account. This is a no-brainer for those of us with just one Safaricom SIM but for those with multiple, please remember to enter the one that you wish to link with PayPal or the one that is registered for M-Pesa. Click “Link your accounts” once done.
    • Enter the one-time verification code that has been sent to your phone.
    That’s it! You’re done. A whole world of opportunities now awaits you. You are now ready to start sending money to your PayPal account for top up from M-Pesa and transferring money from your PayPal account to your M-Pesa for your own needs.
    Just bookmark this link for the next time you need to use the service i.e. to top up or to withdraw.
    Talking about withdrawals and topping up…

    How to withdraw money from PayPal to M-Pesa

    • Go to this link and click on the Withdraw from PayPal button
    • The available PayPal balance will be displayed. (Note from the PayPal-M-Pesa FAQ page: You will only be able to withdraw money up to the available US dollar balance shown in your PayPal account. If you hold a balance in your PayPal account in a different currency, please log in to your PayPal account at paypal.com/ke and convert the money into USD).
    • Enter the amount you would like to withdraw from your PayPal account in USD.
    • You will be redirected to a page showing the amount to be received in KES, the exchange rate used for the currency conversion, and the estimated transaction processing time.
    • Confirm and complete the withdrawal of funds.
    Those who use the PayPal-Equity service, this is eerily familiar and shouldn’t be a problem.

    How to top up PayPal using M-Pesa

    • Go to this link and click on the Top Up to PayPal button
    • Enter the amount you would like to top up in USD and click “Calculate” to get the equivalent amount converted in KES. This is the KES amount you need to transfer from your M-PESA account. The exchange rate used will be displayed on the same page.
    • Go to your M-PESA menu and select “Lipa na M-PESA” then the “Pay Bill” option.
    • Enter Business Number 800088.
    • Enter your phone number as the Account Number.
    • Enter your M-PESA PIN and click “Send”.

    Quick notes

    When it comes to PayPal transactions, other than just the joy of being able to withdraw and top-up from wherever we can access the internet and the Safaricom network, a couple of other things matter: the transaction costs and the amount of time taken to complete the transactions.
    I was pleased when Equity recently revised their PayPal withdrawal rates to as little as just 1.5% of the withdrawal transaction for transactions below $500 so what’s Safaricom’s rate?
    According to the FAQ page, users will be charged “3% conversion fee of the amount withdrawn”. For top ups, the rate rises to 4%. Since top ups require the use of an M-Pesa Pay Bill number, that means that there will be charges as well.
    That money math doesn’t sound as exiting but guess what does? The amount of time that it will take to complete transactions.
    Top ups to PayPal from M-Pesa will take at most just 4 hours to complete even though they will “generally be processed in real time”. Now, 4 hours is like forever if you want to use the money as soon as possible but this is one of those “patience is key” moments (also, one of those rare times when the phrase is not being directed at dejected and “entitled” 20-year-olds by condescending and exploitative 30 and 40-year-olds). For withdrawals, the wait times for the completion of a transaction will vary from as little as 2 hours to as long as 3 calendar days. The word “calendar” is important because I am sick and tired of Equity Bank’s “3 business days” promise that they often fail to keep. 3 calendar days means I no longer have to make sure I’ve withdrawn my money by Wednesday evening.
    Since Safaricom caps M-Pesa transaction limits at Kshs 70,000 per transaction and Kshs 140,000 per user per day, that is likely to be this service’s main undoing for high-volume users. 

    Saturday, 18 May 2019

    Download game of thrones season 8 latest movies and series easily with this app

    download latest movies and series using  crackers movie by bad box app.


    Easily download your latest movies.
    the navigation is also easy and straight forward .


    your popular movies at one place all in HD quality


    Top 10 affordable smart phones

    1. Tecno Spark 7 - Price range: Ksh. 10,499 - Ksh. 11,499     - Display resolution: 720 x 1640 pixels     - RAM: 2GB/3GB/4GB     - Network s...